Chocolate Espresso Shortbread

Quick post!

Just got home for winter break and felt like posting something not too intensive

i.e. I’m too lazy to write a full blog post but I still wanted to share this recipe.

DSC_8758 (1)DSC_8762 (1)DSC_8801 (1)

Enjoy these addictive little cookies!

CHOCOLATE ESPRESSO SHORTBREAD

Makes 24-30 cookies

Ingredients

240g all purpose flour

3g espresso/instant coffee powder

15g dutch processed cocoa powder

1 tsp salt

170g unsalted butter, softened

130g powdered sugar, sifted

1 tsp vanilla extract

2 large egg yolks, room temperature

75g 72% dark chocolate, chopped finely

Directions

  1. Sift together 240g flour, 3g espresso powder, 15g cocoa, and 1 tsp salt in a bowl. Set aside.
  2. In a separate bowl, cream together 170g unsalted butter with 130g powdered sugar until light and fluffy.
  3. Add 1 tsp vanilla extract and 2 large egg yolks. Whip together until well incorporated.
  4. Add the flour mixture in two additions, folding between each addition. Fold until just combined – it’s okay if there’s still some flour visible.
  5. Add the chopped chocolate and fold until just combined.
  6. Divide the dough in half. Place half of the dough on a sheet of plastic wrap that’s about 12 in (30 cm) long. Roll the dough into a log, about 1.25-1.5 in. (3-4 cm) in diameter. Wrap the log up in plastic wrap, then twist the open ends of the plastic and tuck under (like wrapping candy). Repeat with the other half of the dough.
  7. Chill for 2 hours or overnight.

To bake:

  1. Preheat oven to 350F
  2. Slice the log into 0.25 in (0.75 cm) slices and lie them on a parchment lined baking sheet, leaving about 1-2 inches in between each cookie (I fit 12 to a tray).
  3. Bake for 15 minutes, or until lightly brown.
  4. Allow the shortbread to cool down slightly before enjoying.

Notes:

-I use Guittard dutch processed cocoa, Nielsen-Massey Madagascar vanilla, and good quality, grass fed butter. Since shortbread is so simplistic, it’s best to use quality ingredients to make the best final product.

-Shortbread cookies are supposed to be light, buttery, and crumbly, so be sure not to over-mix the dough! That will encourage the development of gluten (flour & kneading) – we don’t want a tough cookie.

~ S ~

Chocolate and Almond Croissants

I’m a believer of simplicity

DSC_8203

With how hectic student life gets around this time of the year, it’s easy to caught up in the stress and deadlines. Take a step back. Do something you love. Spend time with people who make you happy. Breathe.

Pastries and coffee are a reminder of slow afternoons and easy conversations, of brunch turning into lunch and – oh look, it’s sunset now.

DSC_8194

This recipe is a simple two-parter that uses a handful of ingredients. The real lifesaver here is store-bought, full butter puff pastry. I used the pre-made puff from Trader Joe’s because it comes as whole sheets instead of scored sheets so I can cut it to any size.

DSC_8224

DSC_8209.jpg Some tips:

  • Most puff pastry is sold frozen. Make sure to thaw the pastry in the fridge before handling and keep it in the fridge until you are ready to assemble your croissants. You want to keep the butter cold so that the pastry will puff up and have distinct, flaky layers when baked.
  • Use softened butter and room temperature eggs or else the almond filling will seize up. Afterwards, chill the filling in the fridge for a few minutes for easy handling.
  • Don’t roll the croissants too tightly or too loosely. You need to give the pastry space to puff up while also ensuring that the filing doesn’t spill out.
  • Baking rack in the middle of the oven. Don’t burn the tops of your croissants.
  • Lots of powdered sugar.

DSC_8235

DSC_8251

Chocolate | Almond Croissants

Makes chocolate and 6 almond croissants

Ingredients

1 pack | 2 sheets | 1 lb of pre-made puff pastry

1 bar of dark or semisweet chocolate (3.0-3.5 oz.)

3 tbsp unsalted butter, softened

1 eggs, room temperature

2 oz. almond paste

2 tbsp powdered sugar, more for dusting

1.5 tbsp flour

1 egg yolk + 1 tbsp milk for egg wash

Optional garnish: maldon sea salt flakes, slivered almonds.

Directions

  1. Preheat oven to 400 F 
  2. In a bowl, mix together butter, 1 egg, almond paste, and powdered sugar until smooth. Add flour and stir until just combined. Wrap with plastic and chill in the fridge.
  3. Chop the chocolate into 1 cm sticks. It’s okay if the sticks break apart – you just need the approximate width of the pieces to be 1 cm.
  4. Unroll 1 roll of puff pastry on a lightly floured surface. Cut into 8 squares (2 X 4)
  5. Place a stick of chocolate on one side of the square. Roll once. Place another stick of chocolate at where the roll meets the flat pastry. Place a line of egg wash on the free side of the square. Roll until the end of the square – the seam should be on the bottom and be sealed with the line of egg wash. Repeat for all 8 squares.
  6. Brush the tops of the chocolate croissants amply with egg wash and sprinkle sparingly with sea salt. Bake for 15 minutes, or until puffed and golden brown.
  7. While the chocolate croissants are baking, unroll the second sheet of puff pastry and cut into 6 squares (2 X 3). Place 1.5-2 tbsp of almond filling into the center of each sheet, or until all of the filling is evenly distributed among the 6 squares.
  8. Egg wash the edges of each square, then fold over two opposing corners to the middle to form an envelope shape. Repeat for all 6 squares.
  9. Brush the tops of the almond croissants generously with egg wash. Sprinkle on slivered almonds. Bake for 15 minutes or until puffed and golden brown.
  10. Allow the croissants to cool slightly, then dust liberally with powdered sugar. Best served warm.
  • For freezing, place the croissants in a single layer on a baking tray to freeze first. When they’re frozen, you can transfer them into Ziploc bags. You can bake them straight from the freezer at 400F for 20-22 minutes. 
  • To reheat already-made pastry, heat at 350F for 5 minutes.


~ S ~


Taro Porridge

So basically,

I want to do more of what I love.

So I’m bringing this back. Or at least trying to balance this with my other responsibilities (hello classes + exams + papers + dance + two jobs + clubs + social life?? + fam + myself)

Thanks for all the love and support, and thanks to everyone who have reach out to me + asked for more content!

Here’s something simple and sweet to start things off.

DSC_4569

It’s been unusually cold at Berkeley (freeze warning??) for the past few weeks and this hot rice porridge has been my ultimate comfort food. Super easy to make too – you basically just need water, leftover rice, and whatever add-on’s you like.

DSC_4540

DSC_4524 DSC_4542

I used yellow rock sugar as a sweetener because it has a mild sweetness and a somewhat syrupy feel once it’s dissolved. You could substitute it with any sweetener of choice.

You can usually buy either baby taro or large taro root at the store (for those around UC Berkeley – Berkeley Bowl or 99 Ranch). Baby taro has a waxier and smoother texture while large taro root is more fibrous and crumbly, but more aromatic. You can use either for this recipe – I’ve also used kabocha squash to make pumpkin porridge.

Throw them all into a pot, boil, and you’re all set.

DSC_4563

Great for cold days and sick days when you need something to warm you up.

Taro Porridge

(approximately 4 servings)

Ingredients

4 baby taros, or sub with large taro root

2 cups of cooked rice

4 cups of water

Yellow rock sugar – sweeten to taste

dried jujube, pitted and quartered (optional)

Directions

  1. Wash, peel, and cut the baby taro into 1/2 in. x 1/2 in. chunks.
  2. Add water to a large pot and boil on high heat. When the water starts to boil, add the rice, taro, and rock sugar. Stir, cover, and simmer on low heat for 20 minutes.
  3. After 20 minutes, turn off the heat. Allow porridge to sit covered on the stove top for another 15 minutes.
  4. Serve and garnish with dried jujube.


~ S ~

Summer Corn Salsa

I held a late birthday brunch in late July and made this as one of my side dishes. The fresh corn, orange and yellow bell pepper, and sweet tomato were a perfect counterbalance to the richer dishes (garlic rosemary hasselback potatoes and smoked salmon toast with herby cream cheese mmm…). This dish is also vegan and vegetarian friendly.

dsc_0034-1.jpg

This is one of those dishes that looks impressive, but is actually ridiculously simple to  make. I love the “rainbow” effect of the red tomato, the orange and yellow bell paper, and the green cilantro. Prepare yourself for a lot of unnecessary, but pretty and colorful pictures 🙂

DSC_0006 (1).jpg

DSC_0018 (1).jpg

I did 1-1.5 centimeter dices for my vegetables (fruits, I guess), but they don’t need to be this exact measurement. Just pick a size and stick with it.

Add sea salt, black pepper, and olive oil. Taste and adjust.

DSC_0021 (1).jpg

DSC_0026 (1).jpg

A squeeze of fresh lemon juice just brightens and lifts up the entire dish. A handful of fresh cilantro also helps with that.

DSC_0031 (1).jpg

Mix, check for seasoning. It doesn’t get much easier than that.

DSC_0043 (1).jpg

DSC_0041 (1).jpg

This dish is light, easy, and full of flavor and nutrients from the fresh tomatoes, bell peppers, and corn. You can also use grilled corn instead of boiled corn for some smokey charred goodness, and also substitute in cherry tomatoes for the large tomato that I used. The amount of each fruit that I used was enough to serve 8 people as a side dish, so adjust accordingly to your party. The measurements of the seasonings are also just an approximation of the actual amount I used – I just eyeballed everything – but again, this should be according to your personal preferences.

Happy cookin’ everyone.

Summer Corn “Salsa”

Serves 8

Ingredients

3 ears of corn

1 large tomato

1 yellow bell pepper

1 orange bell pepper

2 tablespoons of olive oil

1/2 teaspoon of sea salt

1/2 teaspoon of black pepper

Juice of 1/2 to 1 whole lemon

1 to 1 1/2 cup of fresh cilantro leaves, roughly chopped

Directions

  1. Boil the corn for 5 minutes. Remove from the pot.
  2. While the corn is cooling, prepare the rest of the ingredients. Cut the tomato into fourths and remove the seeds. Then, dice the tomato and bell peppers. Wash the cilantro, pick off the leaves, and roughly chop the leaves only.
  3. When the corn is cooled, remove the husk (if any) and shear off the kernels with a knife. For this, I like to place a small bowl, upside down, into the middle of a larger and shallow dish. Place the corn vertically onto the small bowl and use the knife to cut down each side. The small bowl will elevate your ear of corn so that the knife can cut down the entire length of the cob without hitting the rim of the larger dish. Then, run the blunt/back edge of the knife down the cob to extract any of the kernels that were left behind.
  4. Add the diced bell peppers, diced tomatoes, and corn kernels to a large bowl. Add salt, black pepper, olive oil, and lemon juice. Toss to combine. Test for seasoning and adjust accordingly.
  5. If the dish will not be served immediately, cover the bowl with plastic wrap and place it in the refrigerator. When you are ready to serve, take out the bowl and add in the chopped cilantro. Toss to combine.


~S~

Easy Banana Bread

Anyone who knows me well knows that I really, really, really hate bananas. I hate their sickly sweet, slimy mushiness mixed the the weird aftertaste of banana-i-ness. I don’t like ’em.

But I’m okay with them in banana bread.

DSCN3762.jpg

The batter is very simple to make. This was one of the first recipes I learned to make when my aunt bought me my first electric hand mixer in third grade.

DSCN3726.jpg

DSCN3730

The addition of overripe bananas makes the bread sweet and moist. The browner and more inedible the banana looks, the better.

You can replace the pecans and chocolate chips with walnuts, black sesame seeds, pumpkin seeds, or raisins. These tidbits make the bread hearty and wholesome. If you just can’t be bothered, you could also choose to forgo the add-ins, but you’ll end up with a naked-looking and totally inferior banana bread.

DSCN3746

*The loaf pans need to be buttered, floured, and lined on the bottom so that the banana breads come out cleanly when they’re baked. You start by rubbing softened butter onto the inside of the loaf pan, then dusting the inside with flour. Next, trace out and cut out an outline of the bottom of the pan with parchment paper, then line the bottom of the pan with this cutout. This method can be applied to most other cake recipes.

Let these bake in the oven for 40 minutes. They want a nice, golden tan for the summertime too.

DSCN3752.jpg

Make some coffee. Have some friends over. Show them what you made. And eat. Lots.

DSCN3763DSCN3767.jpg

Light but dense, soft but crunchy, sweet but nutty. More like a cake than a traditional bread.

And best of all?

None of the drawbacks of eating a real banana.

Bleh.

Easy Banana Bread

Makes 2 8-inch loaves

Ingredients 

3 overripe bananas

1/2 cup of unsalted butter at room temperature

1 cup of light brown sugar

3 eggs at room temperature

1/4 cup of milk

1 teaspoon of vanilla extract

2 1/4 cups of all purpose flour

2 teaspoons of baking powder

1 teaspoon of baking soda

1/2 teaspoon of salt

3/4 cup of crushed pecans

1/2 cup of mini chocolate chips

Directions

  1. Preheat oven to 350 degrees Fahrenheit. Butter, flour, and line 2 8-inch loaf pans*.
  2. Mash the bananas in a bowl with a fork. Set aside.
  3. Place the pecans in a plastic bag and crush with a rolling pin. Set aside.
  4. Cream together butter and light brown sugar with an electric mixer until pale and creamy.
  5. Add the eggs one at a time, making sure the eggs are well incorporated after each addition.
  6. Add the milk and vanilla extract and mix until evenly incorporated.
  7. Sift in the flour, baking powder, baking soda, and salt. Mix on low until well incorporated.
  8. Add the crushed pecans, mini chocolate chips, and mashed bananas. Using a silicone spatula, stir gently until evenly dispersed.
  9. Divide the batter evenly between the two prepared loaf pans. Place the pans on the same rack in the oven. Bake for 40 minutes, or until a skewer inserted into the middle of the loaf comes out clean and that the exterior of the banana breads is golden brown. Remove from the oven and allow to cool.
  10. Run a knife along the edges of the loaf pans to release the loaves. Turn out the banana breads onto a cutting board or cooling rack.

When the banana bread is completely cooled, you can store them by transferring them into a clean plastic bag (used for produce in grocery stores) and use a twist tie to secure the opening.

~ S ~


Matcha Cupcakes

DSCN3617 (2).jpg

Hey guys, it’s been a while.

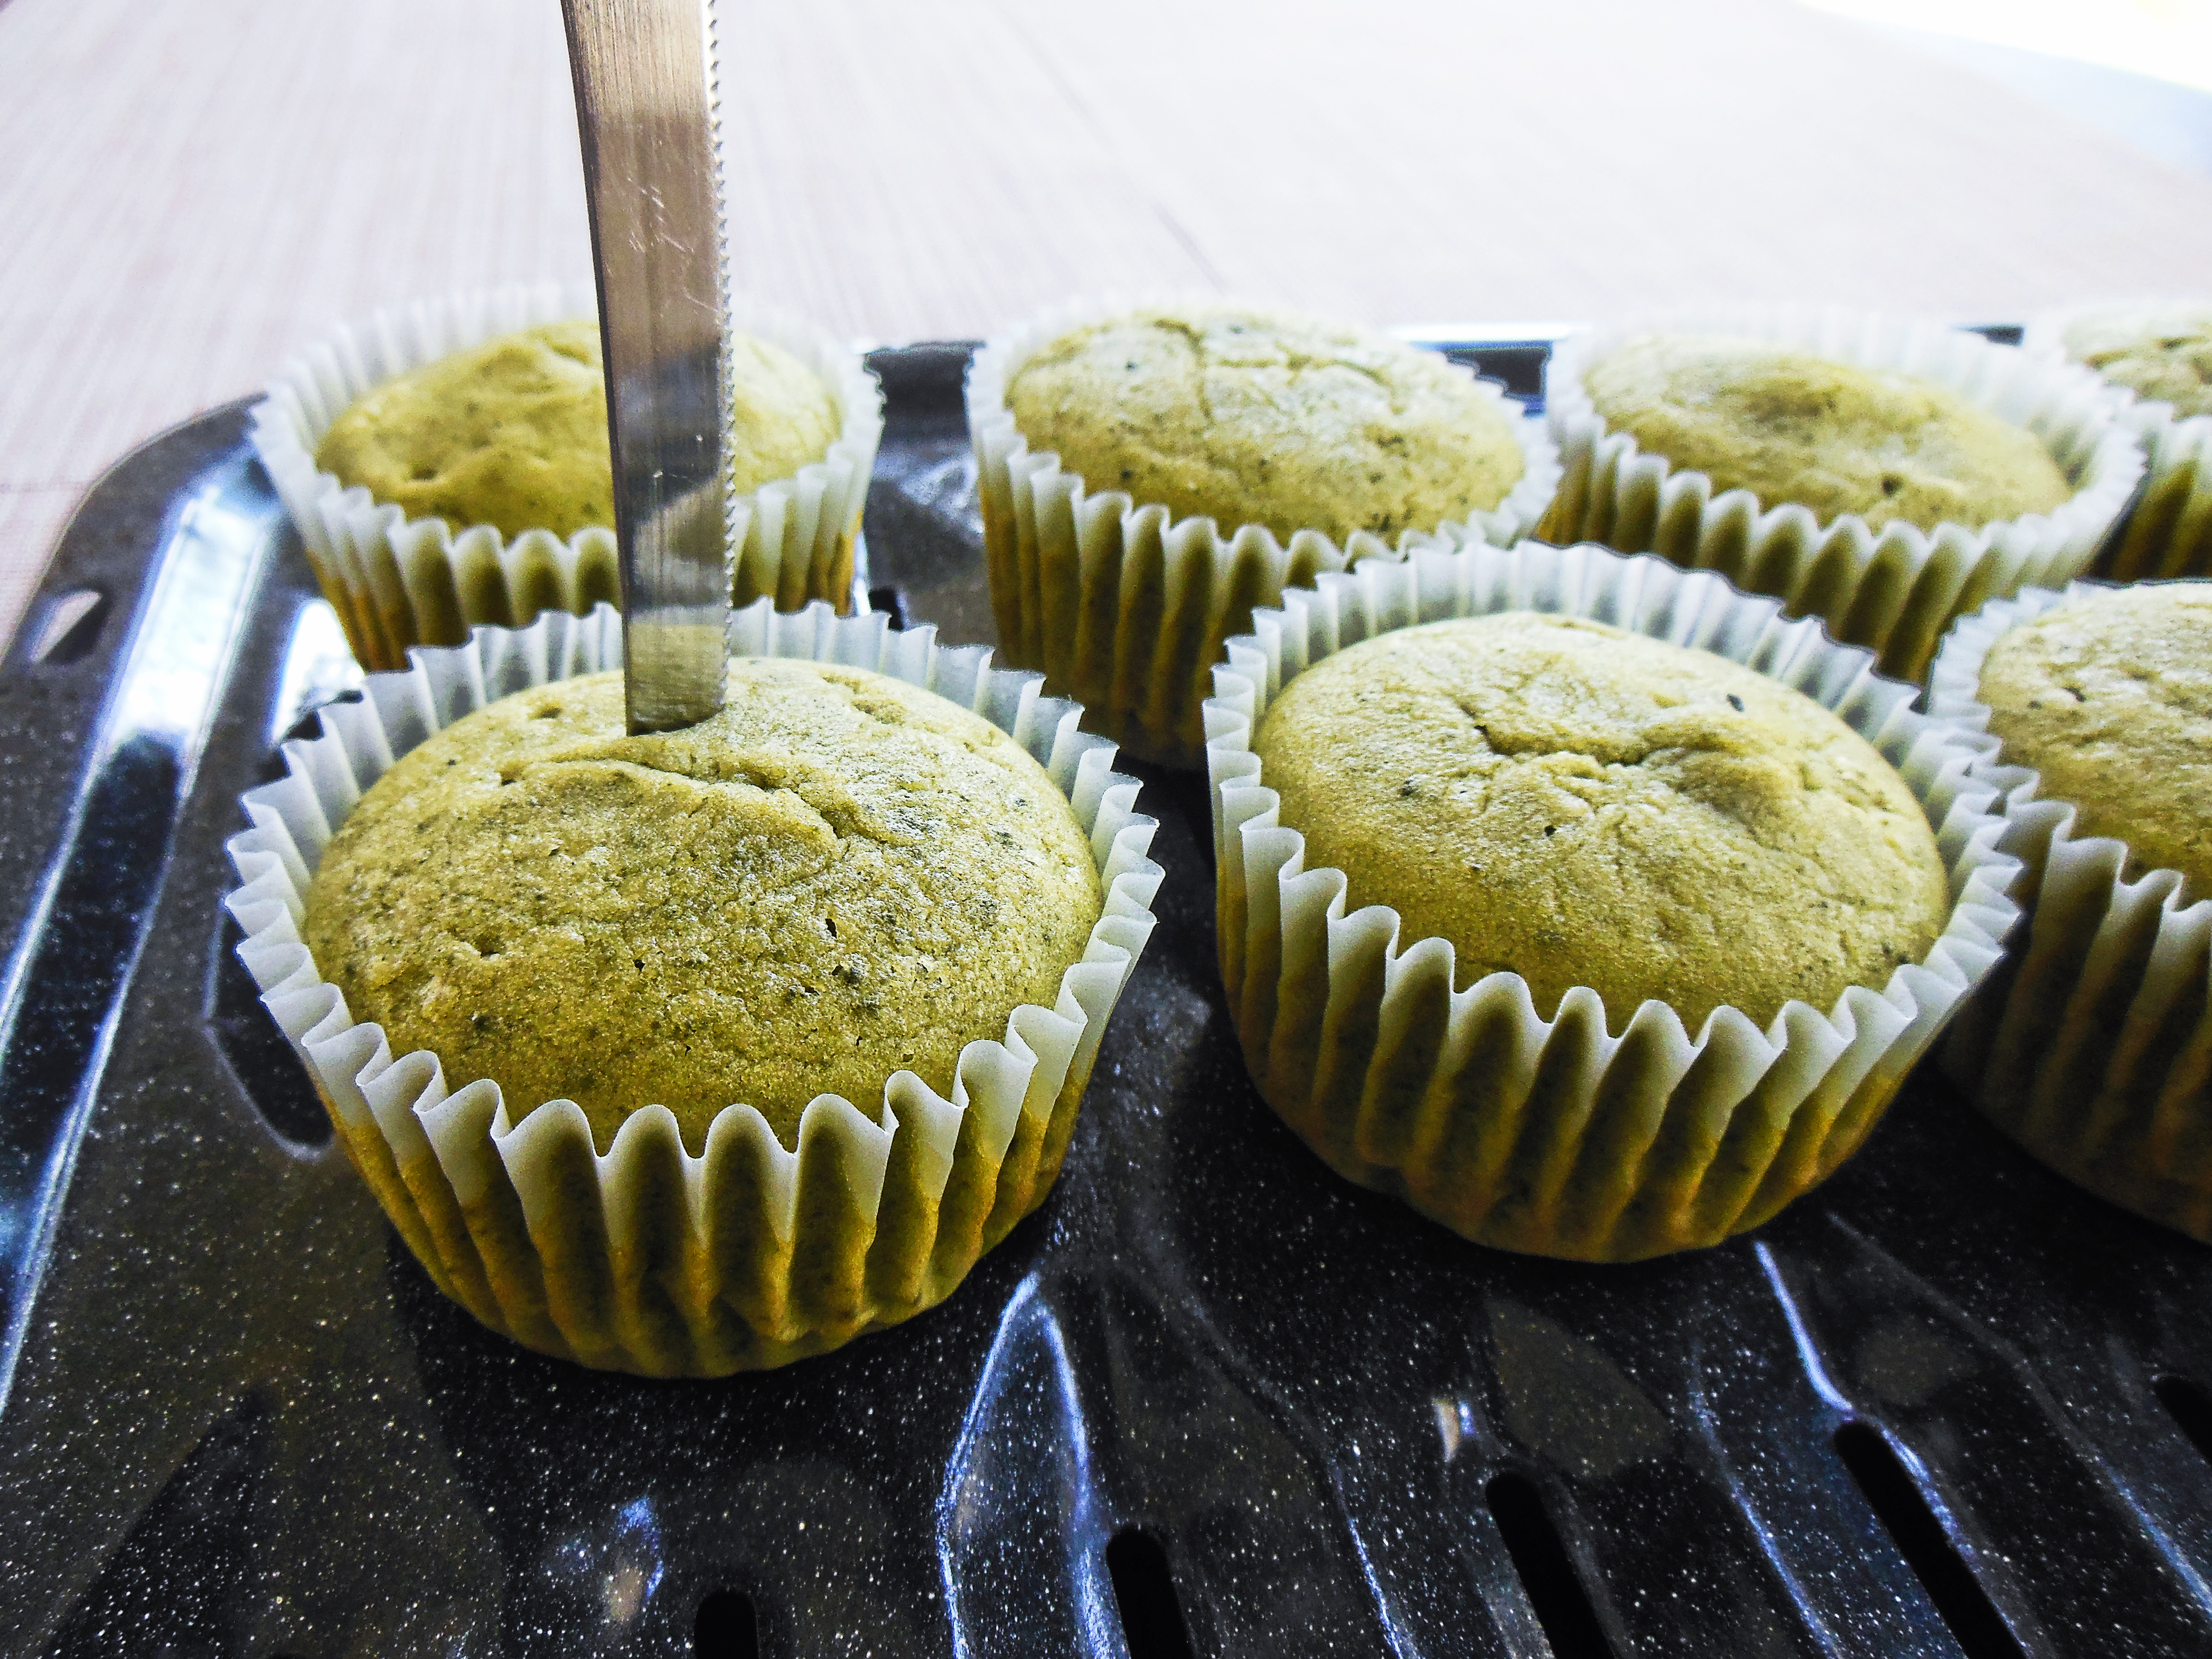
This recipe is for all the matcha lovers out there. Green tea cupcake, green tea cream cheese frosting, white chocolate core… y’all better buckle down ’cause this cupcake’s got all the frills and works.

DSCN3660 (2).jpg

I combined the “Matcha White Chocolate Cupcake” recipe from The Scran Line with the cream cheese frosting recipe from Oishii Treats to make these cupcakes, with minor adjustments along the way.

The batter uses yogurt, butter and oil – yogurt for added richness, butter for flavor and lightness, and oil for moisture.

dscn3608-2.jpg

DSCN3612 (2).jpg

Japanese matcha is a pricey ingredient, but I think its unique, bitter flavor and lovely color is well worth the splurge. I got mine at H-mart (Ito-en Matcha Love Culinary Matcha), but it’s also available at other Asian supermarkets and on Amazon.

DSCN3620 (2)

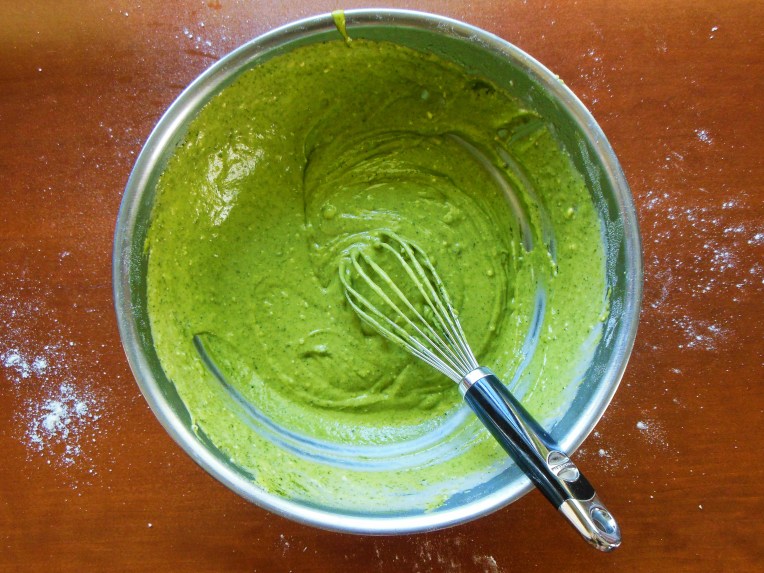
Do as I say and not as I do: do not over-mix the batter once you combine the wet and dry ingredients. Just fold gently until the flour disappears into the batter. Excessive beating will develop gluten strands and create a dense, tough cupcake. We want a light, airy, fluffy cupcake.

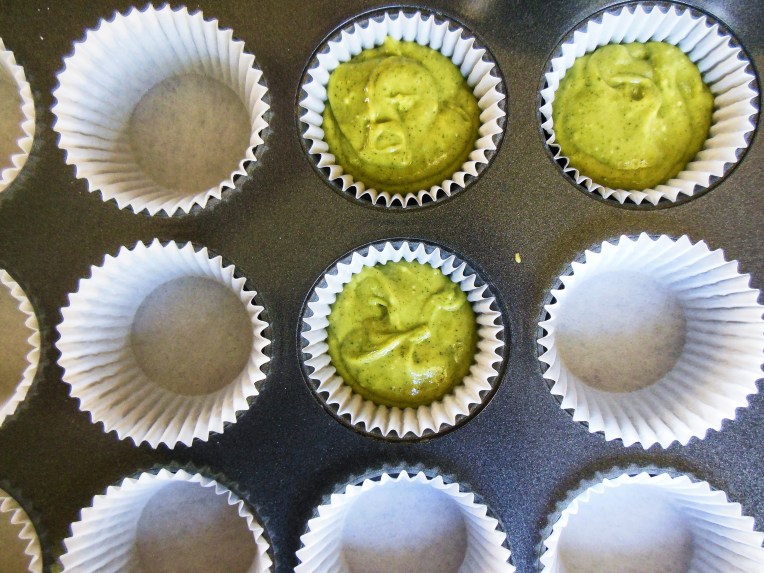
You can add 1-2 drops of green food coloring for a more intense color, as color fades during baking. I decided to go au naturale.

dscn3618-2.jpg

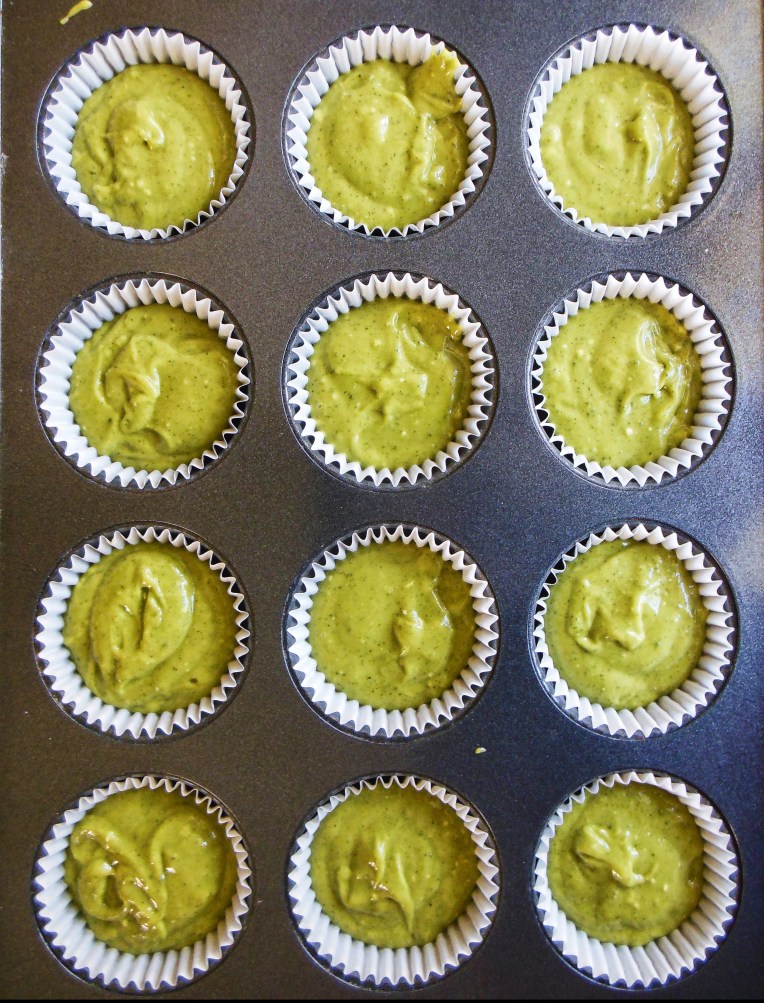
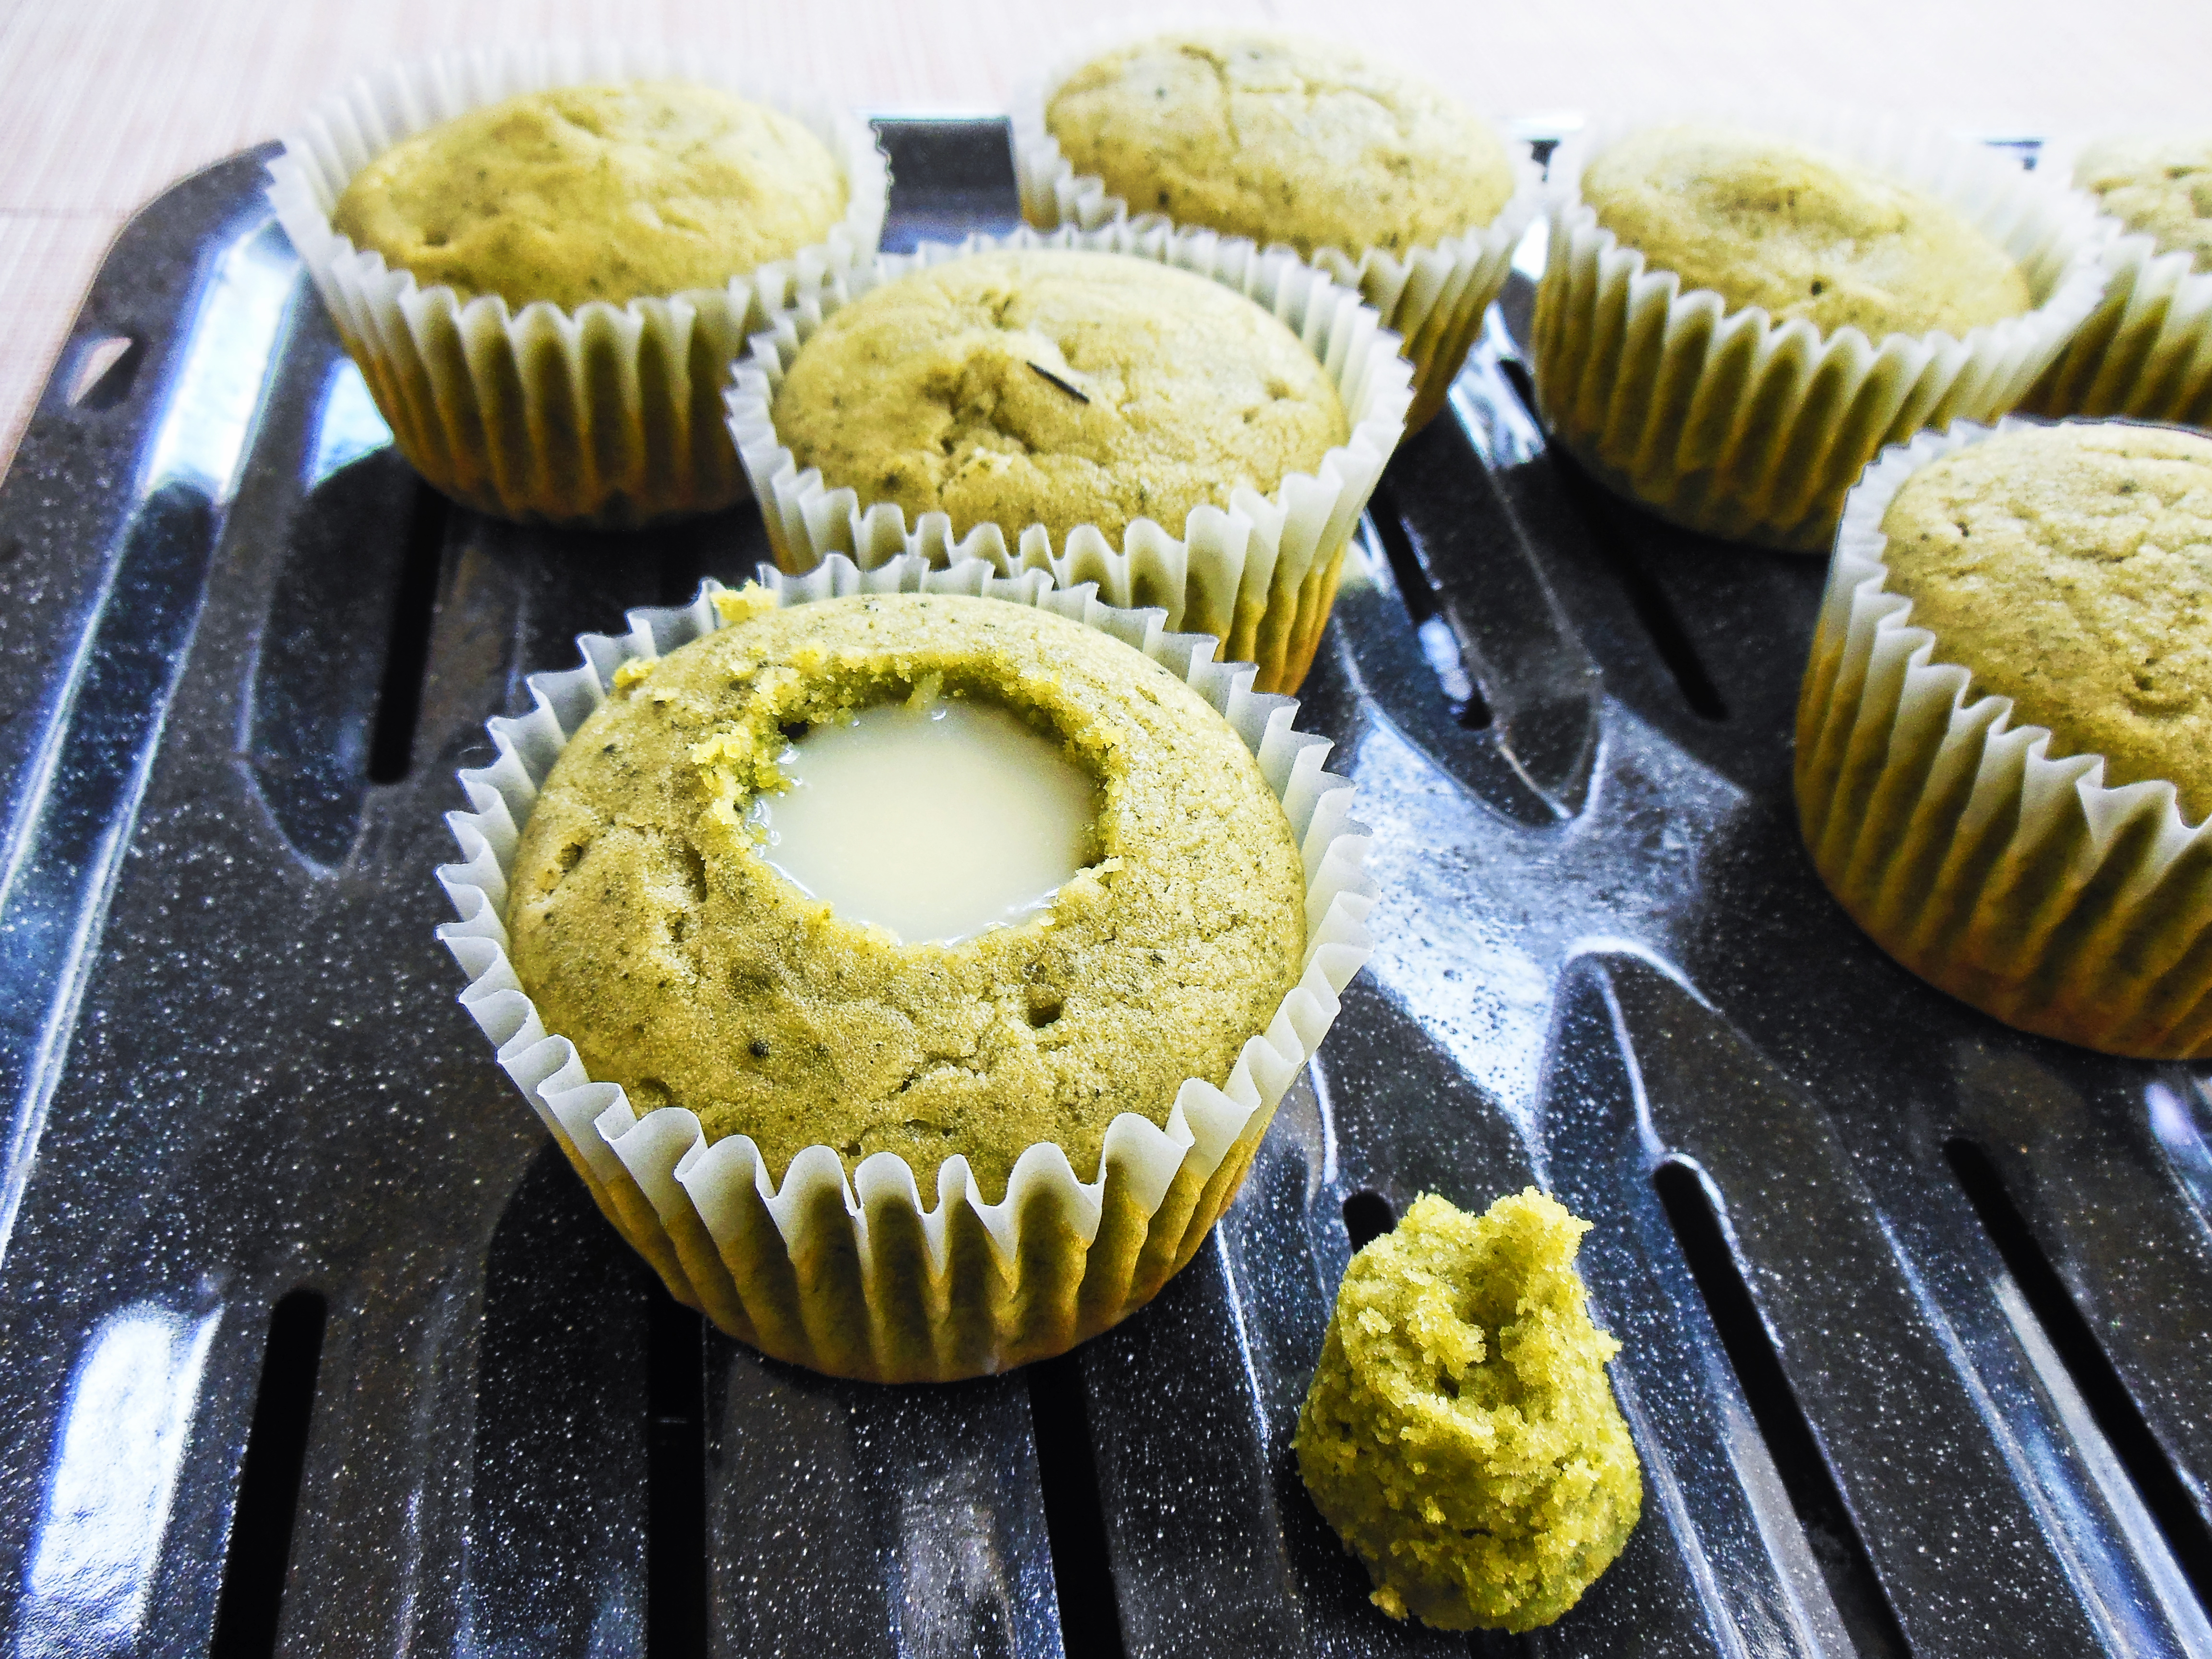
I believe in the clean look of crisp, white cupcake liners. Feel free to go crazy with colors and patterns.

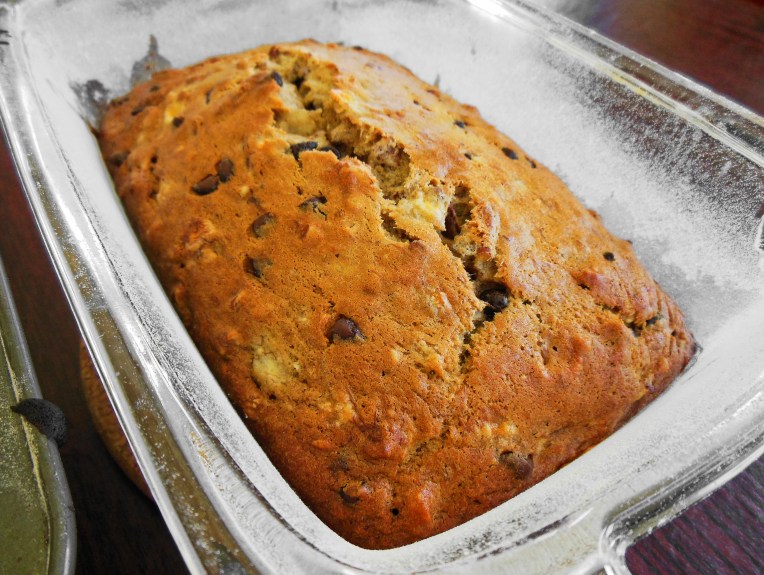
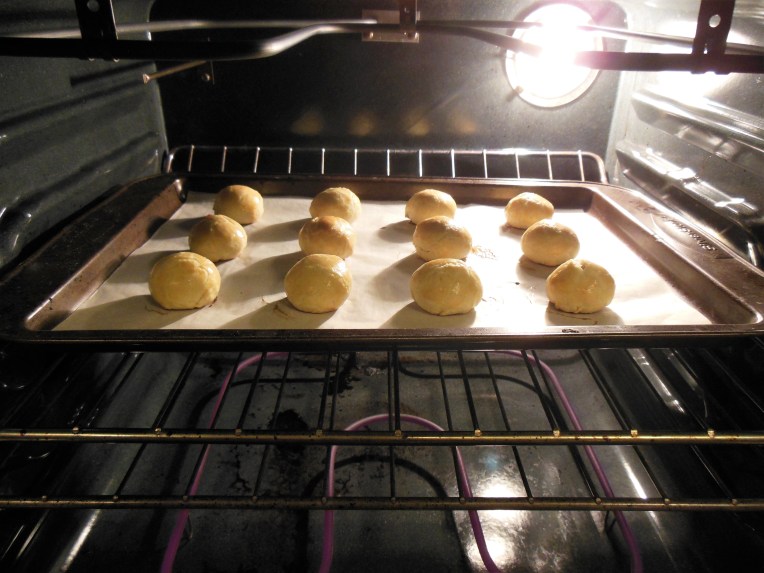
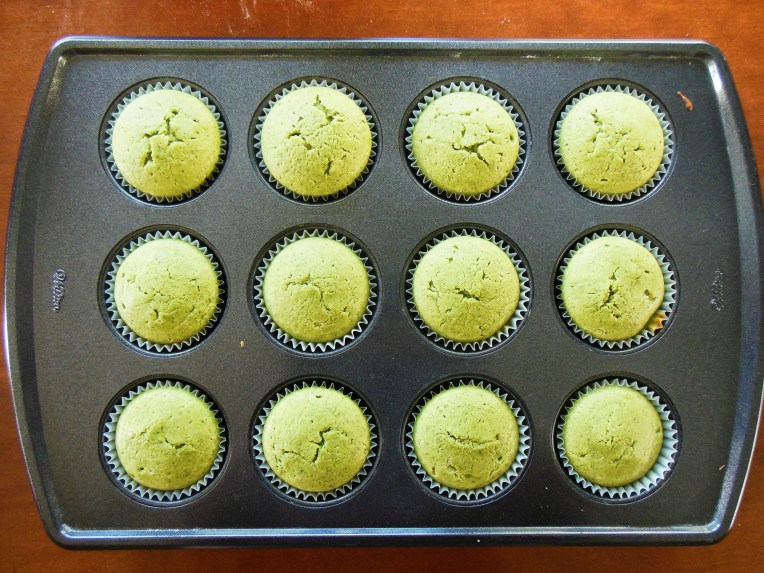
I thought that I was making a dozen cupcakes, but after the first batch was in the oven, I realized that this recipe actually makes two dozen cupcakes. Good mistake.

My friends were happy receivers of the extra cupcakes that I hand delivered.

DSCN3624 (2).jpg

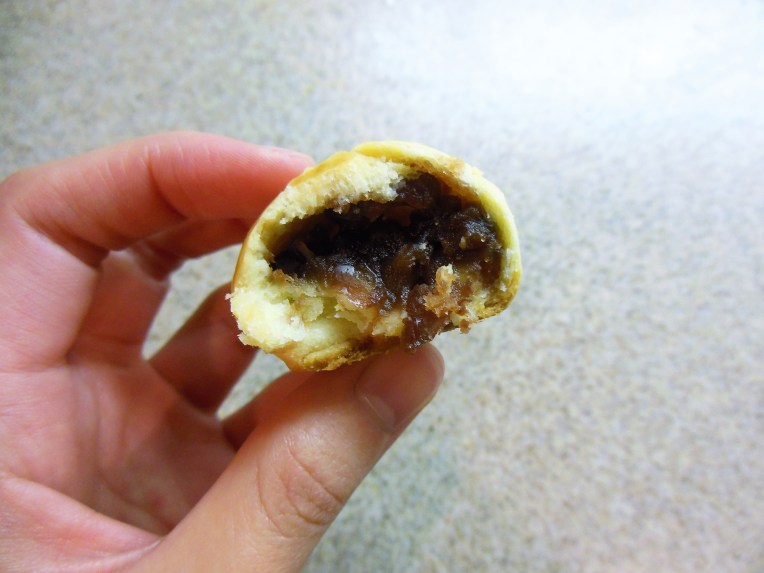
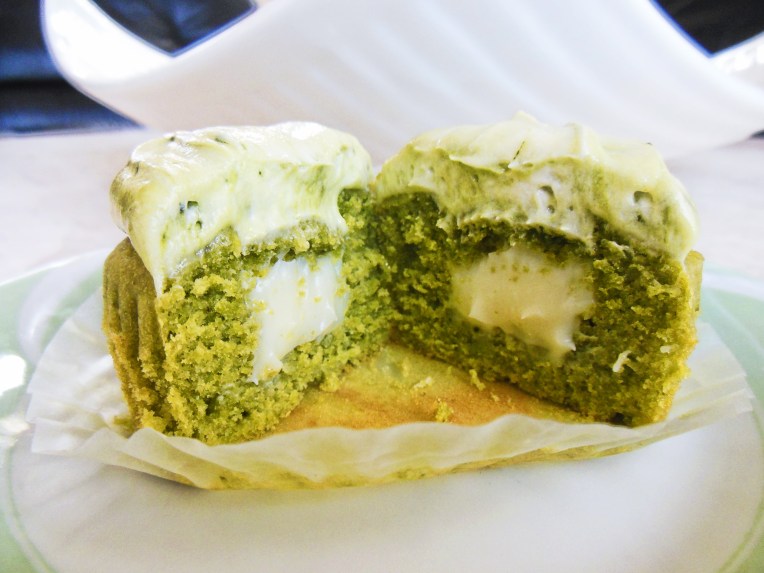
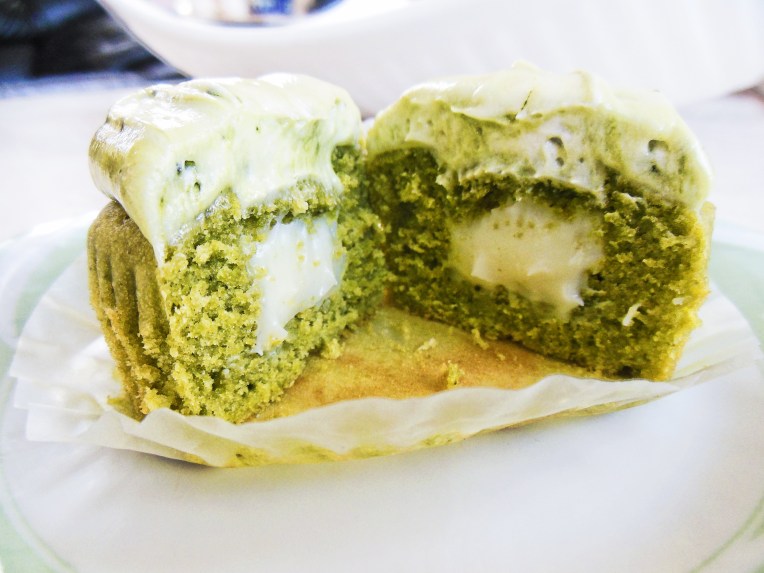
Put in the extra effort and fill them with white chocolate ganache. Be a fancy cupcake.

It’s such a satisfying feeling when you cap the ganache with the cake piece you removed. Round hole, round peg. Perfect fit.

Who doesn’t like a secret chamber of molten white chocolate goodness?

You can also mix in a tablespoon of matcha powder into the ganache for an all around green tea experience. I was feeling stingy and wanted to save that bit of matcha for another day. Maybe a latte. Maybe cookies.

DSCN3642 (2).jpg

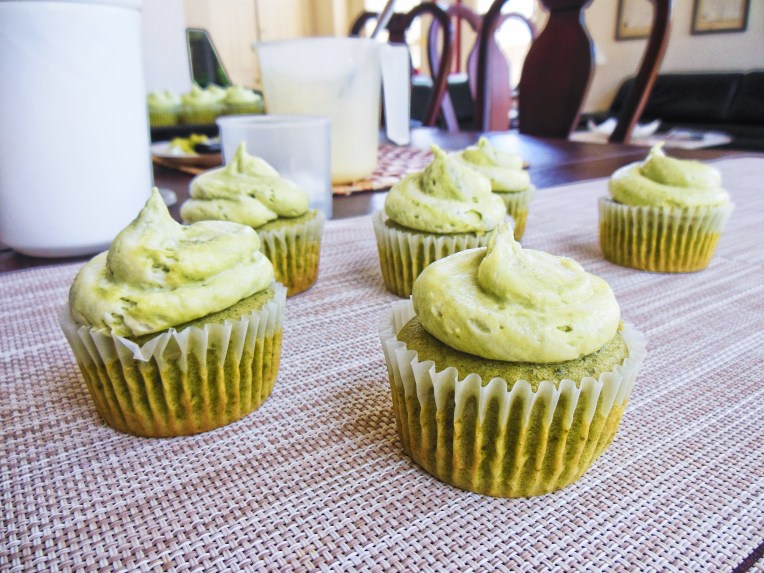
A generous swirl of cream cheese icing to top off these cupcakes. The tang from the cream cheese complements the sweetness of the white chocolate and the earthy aroma of the green tea.

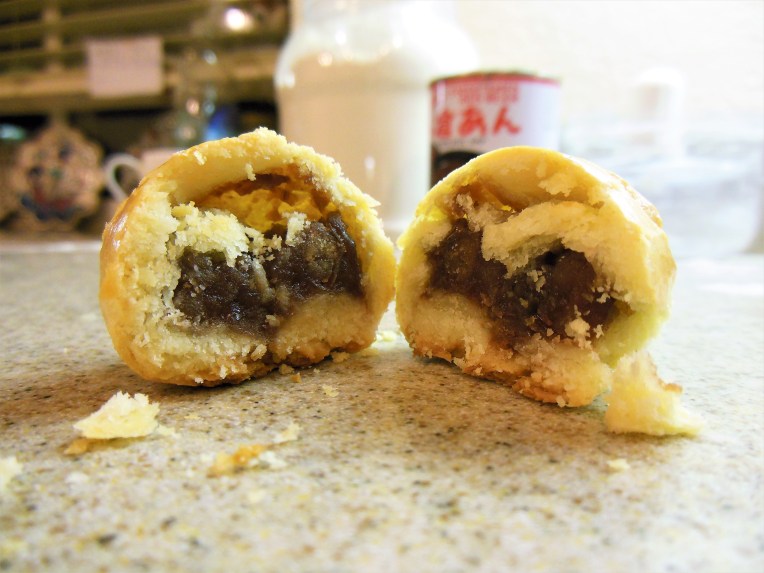
Slice in half and enjoy the cross section. Good job.

DSCN3665 (2)


Green Tea Cupcakes

Makes 24 (using 12 cup muffin tin)

For the Cake: 

429g all-purpose flour

3 teaspoons baking powder

240g granulated sugar

1/2 teaspoon salt

355ml of milk + extra splash of milk if needed, warmed

125ml vegetable oil

125g unsalted butter, melted

80 ml Greek yogurt (can substitute with sour cream)

1 teaspoon vanilla extract

2 large eggs at room temperature

3 tablespoons of matcha powder

The Scran Line: Matcha White Chocolate Cupcakes 

  1.  Heat oven to 160C (320F). Line cupcake tin with paper cupcake cases.
  2. In the bowl, whisk together flour, baking powder, sugar, matcha powder and salt.
  3. Combine the melted butter, milk, eggs, yogurt, oil and vanilla extract in a large jug and whisk well.
  4. Add dry ingredients to wet ingredients in two turns, mixing gently in between additions until no dry ingredients are visible. Do not overmix. You may add 1-2 drops of green food dye to make it a little greener.
  5. Fill each paper 3/4 of the way. Bake for 20-25 min or until a toothpick inserted comes out clean. Allow them to cool completely on a cooling rack before frosting

For the Frosting: 

6 tablespoons unsalted butter at room temperature

8 oz cream cheese

2-3 cups powdered sugar, or to desired sweetness

1-2 tablespoon milk, or to desired consistency

2-3 tablespoons matcha powder

Oishii Treats: Matcha Cream Cheese Frosting

  1. With an electric mixer, combine butter and cream cheese and beat on high until smooth (about 3 minutes).
  2. Sift in powdered sugar 1 cup at a time until fully incorporated, adding milk to help thin it out.
  3. Mix in the matcha powder and whip on high until mixed thoroughly. Whip for another 3-4 minutes until fluffy. Alternatively, you can add the matcha powder in the end and fold it gently with a spatula for a more “marbled” finish. 

For the White Chocolate Ganache:

1/2 cup white chocolate chips

1/4 cup heavy cream

  1. Combine the white chocolate chips and heavy cream in a microwave safe bowl. Microwave for 30 second intervals, stirring in between, until the white chocolate dissolves completely into the heavy cream (took me 2 turns). Let it cool until slightly thickened.

To Assemble: 

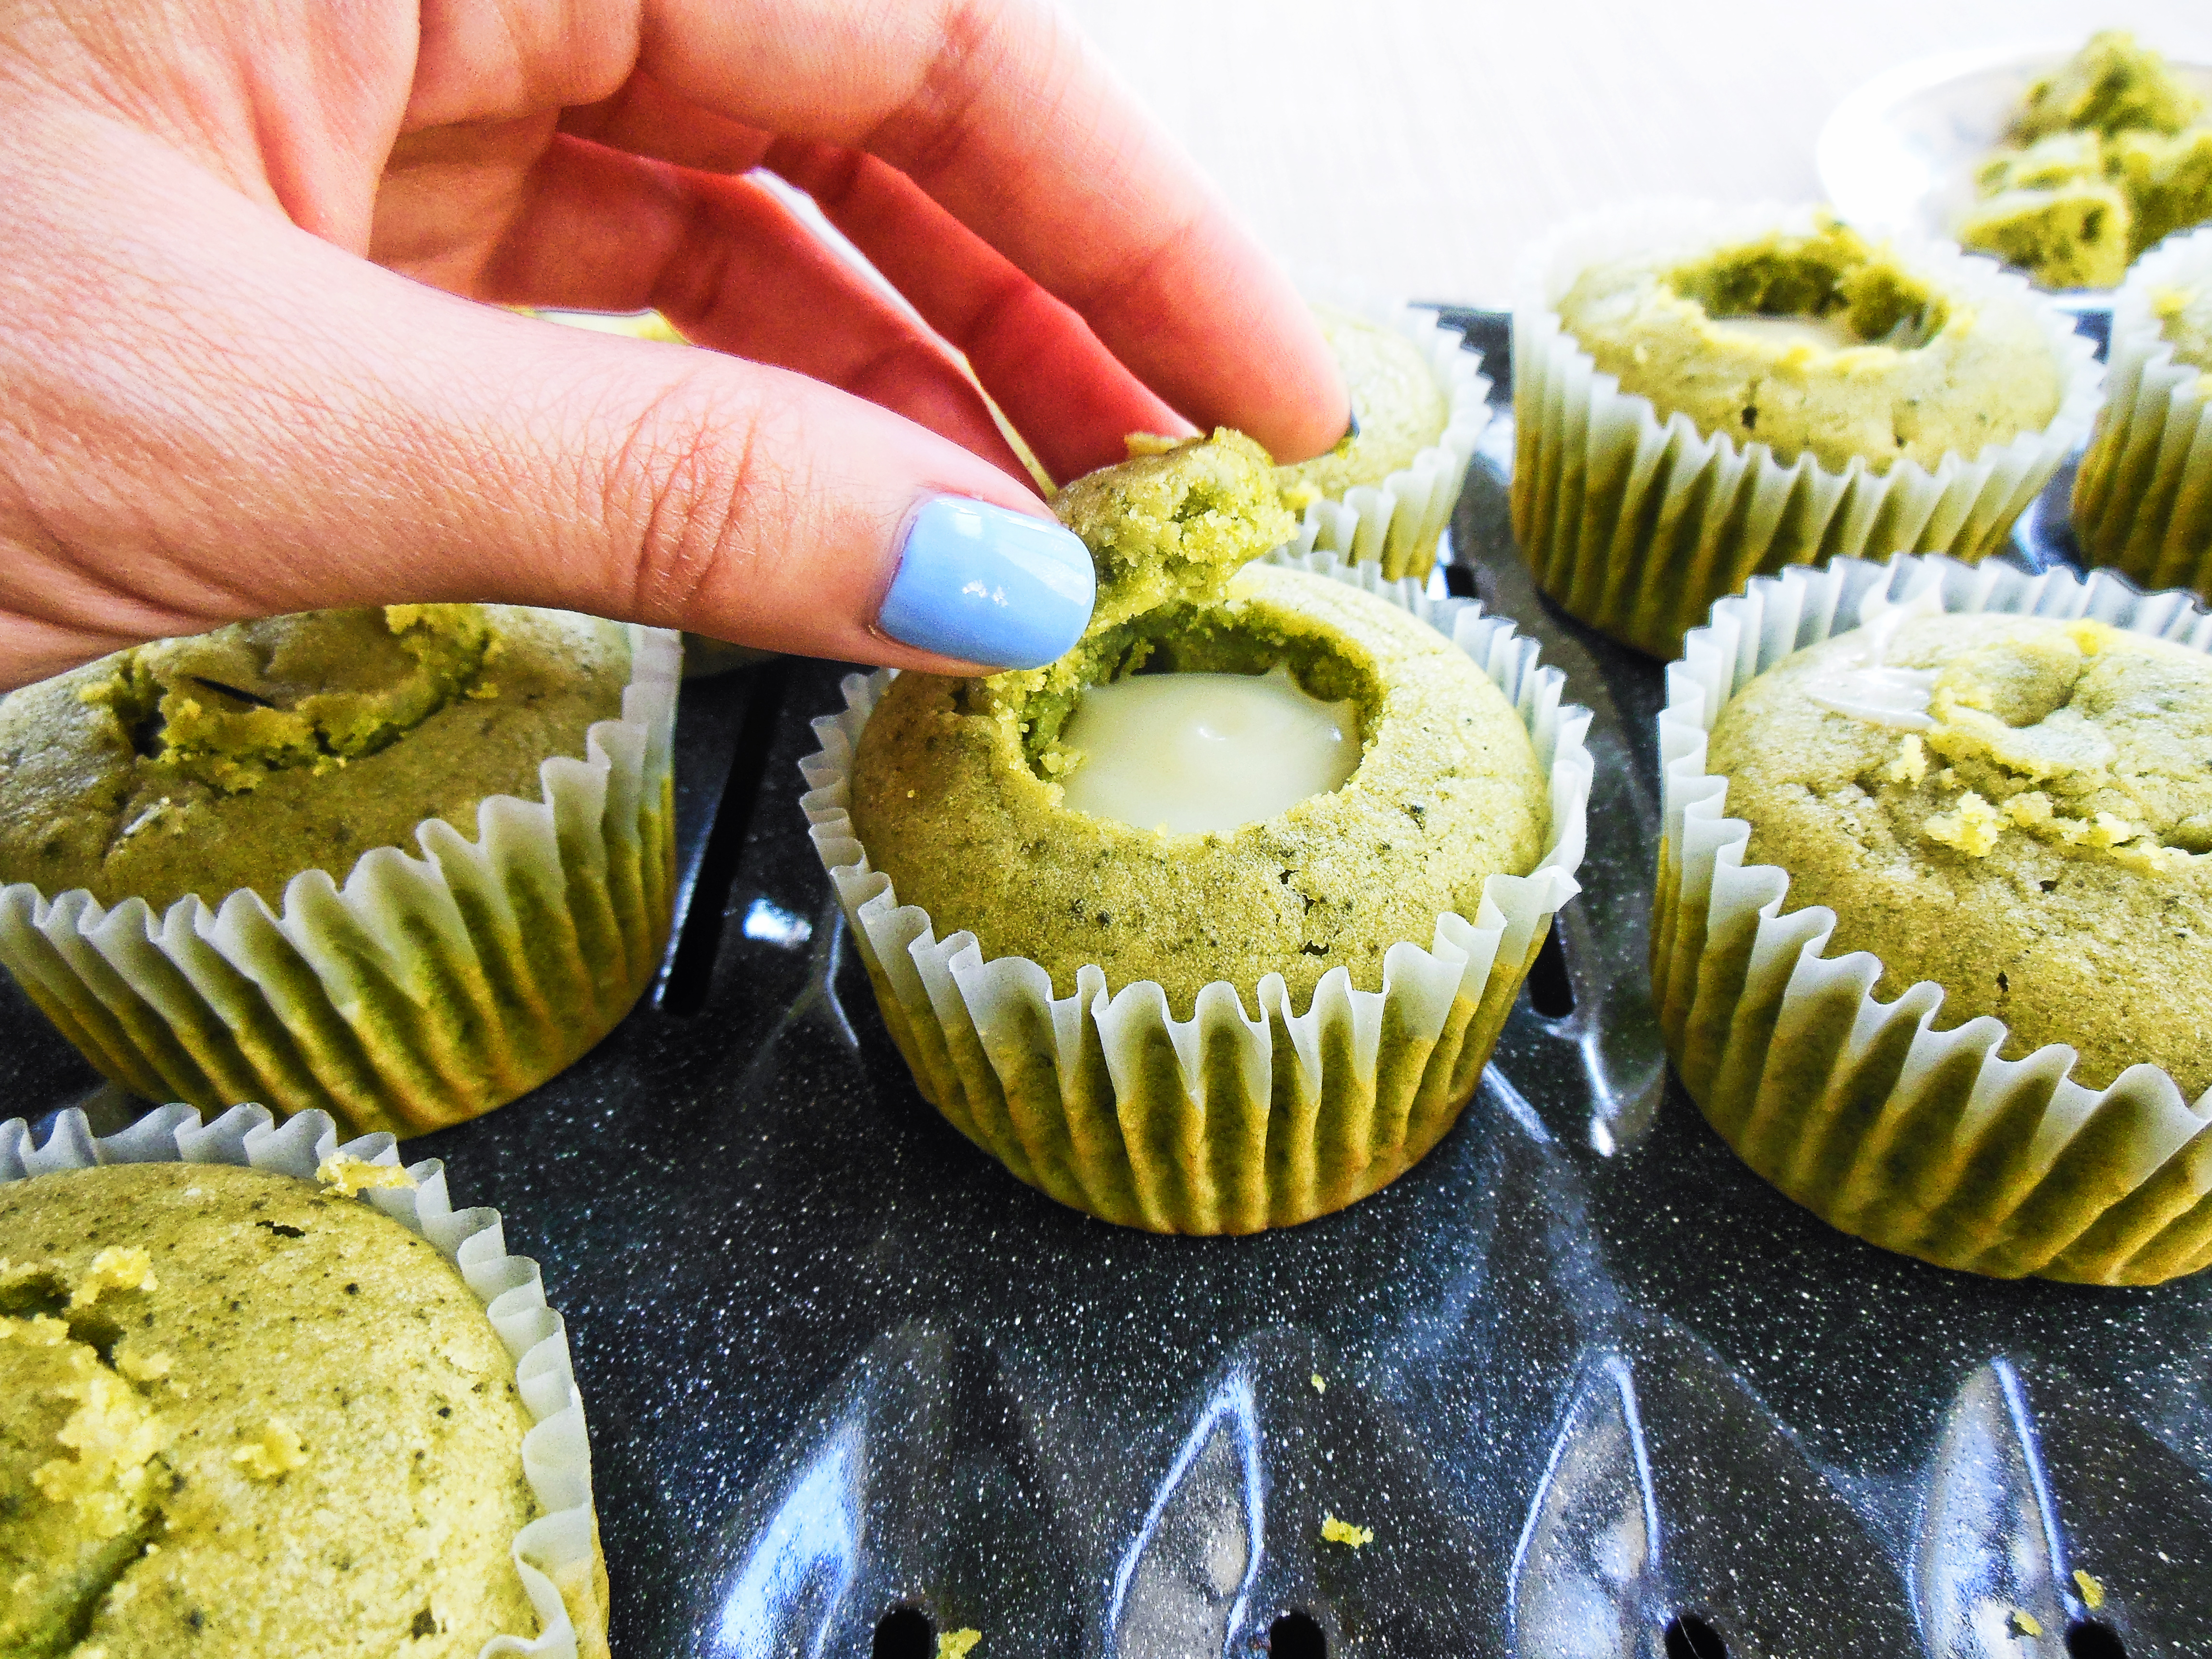
  1. Using a thin, sharp knife, cut a circle in the middle of the cupcake with the knife about 2/3 way into the cupcake. Use a gentle, sawing motion. Remove the core.
  2. Pour or pipe the ganache into the hole until almost filled.
  3. With the removed cake core, trim it until it’s about 1/4 of an inch thick. Then place the cake round over the ganache to seal the cupcake.
  4. Place the cream cheese frosting in a piping bag fitted with a large round tip (or cut an opening around 1/2-3/4 inch in diameter). The frosting will be too thick to pipe with a smaller piping tip. Pipe a large swirl onto the cupcakes. Alternatively, you can ice the cupcakes with a small offset spatula. The style of icing is completely up to you.

To Store: If you can, store the cupcakes and icing separately. Place the cupcakes in an airtight container and leave them at room temperature. Place the icing in an airtight container and put it in the refrigerator. If you want to make these for an event, you can make all of the components the day before and assemble them the day of. Microwave the ganache for 30 seconds to make it easier to pour.

~S~

Dark Chocolate Hokkaido Milk Bread

When I get bored, I bake.

dscn3427-2

As a result, my family had an endless supply of freshly baked goods for the entirety of winter break.

dscn3457-2

dscn3382-2
Tangzhong (湯種)

This break, I decided to revisit my roots and make more Asian desserts. This recipe employs an Asian baking technique called the tangzhong method, where you make a roux out of water and flour and add it to your bread dough. The roux retains water and will keep the bread moist during the baking process. The flour in the roux is sealed away and will not develop gluten during the kneading process. As a result, the bread will have a soft, pillowy texture that stays fresh for a longer period of time.

This recipe is perfectly manageable without a bread machine. I’m just lazy.

dscn3384-3

dscn3387

Few things in life can compare to the sensation of warm, soft bread dough. Ain’t she a beaut?

To test if the dough has properly risen, dip a finger in flour and poke it into the dough. If the hole that your finger made keeps its shape, the dough has risen properly.

 I made the impulsive decision to spice things up with a bit of dark chocolate. Best decision ever.

dscn3407

You know what else would’ve been good? Nutella. Too bad I didn’t have any on hand.

dscn3409-2

dscn3420-2

Make sure to grease and line your pans wells so the milk bread slides out easily once it’s baked.

Apply egg wash for a glossy, golden brown finish.

dscn3434-3

These are best served while they’re still warm.

dscn3451-2

Ooey, gooey dark chocolate. Divine.

I like to keep my bread in a clean plastic grocery bag with a twist tie so that it doesn’t dry out. Make sure the bread is completely cooled so condensation doesn’t form on the inside of the bag.

Got stale bread after a few days? These make excellent french toast.


Dark Chocolate Hokkaido Milk Bread (北海道奶香麵包)

Prep Time: approx. 2.5 hours | Baking Time: 30-35 min | Makes 2 Loaves

Ingredients

Tangzhong (36 g flour and 180 g water)

540 g all-purpose flour

54 g milk

2 eggs

108 g melted unsalted butter

86 g white sugar

5 g salt

100 g dark chocolate chips, crushed with food processor (or whatever you fancy – milk, semisweet, bittersweet. If you have mini chocolate chips, you don’t need to use a food processor).

1 egg yolk

1/2 teaspoon milk

Directions

  1. To make tangzhong /roux: Whisk together flour and water in a pot or double boiler until thick, glossy and slightly translucent. Transfer into a bowl, cover, and keep in refrigerator until chilled.
  2. For the dough:
    1. Bread machine: place all of the ingredients, minus the chocolate, in your device and use whatever “dough” setting it has. My machine kneaded the dough for 20 minutes and let it rise for an hour.
    2. Manual: place all of the ingredients, minus the chocolate, in a bowl. Mix until well combined, then knead for 10-15 minutes or until smooth and slightly elastic. Cover and place in a warm place for an hour or until dough has risen and doubled in size.
  3. Uncover and remove the dough from the bowl. On a lightly floured surface, divide the dough in half.
  4. Work with one half at a time. Using a rolling pin, roll the dough until it’s about 1/4 to 1/2 inch in thickness. Sprinkle on 1/2 of the chocolate, then gently roll up the dough, like a sleeping bag, until it forms a log. Divide each log into 3 portions and twist and knead each portion until the chocolate is well embedded and distributed. You should have 6 balls of dough by the end of this process.
  5. Preheat oven to 170 C /338 F.
  6. Grease and line the bottom of two loaf pans. Place 3 balls of dough into each loaf pan. Cover each pan with a damp paper towel and leave them in a warm place to rise for 40 minutes.
  7.  Whisk together egg yolk and milk to make an egg wash. After the bread has risen, uncover and thoroughly brush each loaf with egg wash.
  8. Place the pans in the center of the preheated oven and bake for 30-35 minutes or until a toothpick comes out clean. Remove from the oven and let them cool slightly on the countertop before unmolding and serving.

S & A


Tenderloin Porchetta

dscn3222-2

Let’s take a moment to appreciate how juicy that piece of tenderloin is.

I found this recipe on Foodwishes.com and decided to make it for my mom’s birthday. Tenderloin can be difficult to work with because it’s so lean and dries out easily. The recipe, however, yielded an aromatic and tender roast with little effort.

dscn3137

Note: Chop the rosemary very finely. I thought a food processor would do the trick but the fresh rosemary was too tough for the blades. I tried a mortar and pestle – still didn’t work. I ended up biting into big chunks of rosemary while I was eating and really didn’t enjoy it.

dscn3153

This rub was so fragrant that it made me sneeze.

dscn3156

Trim off any connective tissue or fat from the pork.

Time to get your hands dirty.

meatstrip

Bacon? Yes please.

file_007dscn3159

The fat from the bacon will help keep the tenderloin moist.

dscn3205

Oh! Bonus garlic bread recipe!

dscn3212

But back to the main dish:

dscn3219

dscn3226-3

dscn3227-2

So many yes’s.

By the way, that’s baby kale sauteed with 1 clove of crushed garlic, vegetable oil, and salt.

Go make these and impress your friends and family, or impress yourself because you didn’t screw up on an expensive cut of meat.

But seriously, the sage, garlic, rosemary, and hint of lemon with the juicy tenderloin and smoky bacon is a combination worth trying.

Tenderloin Porchetta

From Foodwishes.com “‘New Year’s Baby’ Porchetta”

Prep Time: 30 min | Cook time: 20-25 minutes | Serves 4

Ingredients:

1 boneless pork tenderloin roast, about 1 to 1 1/2 pounds

about 8 strips bacon or enough to wrap

For the spice rub:

1/2 teaspoon whole fennel seeds

3 cloves sliced garlic

1 tablespoon finely sliced sage leaves

2 teaspoons finely chopped rosemary

1 1/2 teaspoons freshly ground black pepper, or more to taste

1 teaspoon salt, or more to taste

zest from 1 lemon

1 tablespoon olive oil

Directions:

  1. Add fennel seeds, garlic, sage leaves, and rosemary to a food processor or mortar and pestle. Process until fine. Add black pepper, salt, lemon zest, and olive oil and continue to process until well incorporated. The mixture should look like a rough paste. It doesn’t need to be completely smooth.
  2. Trim pork tenderloin if needed. Cut a pocket along the length of the tenderloin, starting and ending an inch from the tips and not cutting completely through the meat. Spread 1/3 of the spice rub evenly in the pocket. Close the pocket and spread the remaining rub on the outside of the tenderloin.
  3. Place the tenderloin seam side down. Starting from the end, wrap a single layer of bacon around the tenderloin. Try to start and end each strip of bacon at the bottom of the tenderloin, where the seam is. That way the weight of the tenderloin will keep the bacon wrapped when it cooks. For more information, watch the video on Foodwishes.com.
  4. Wrap and chill the pork in the refrigerator for 1 hour or until serving.
  5. When ready to serve, unwrap the pork and place it on a foil-lined baking sheet that has been lightly oiled. Roast at 450 degrees Fahrenheit for 20-25 minutes or until internal temperature reaches 134 degrees Fahrenheit.
  6. Remove from oven and let rest for 15 minutes. This helps to keep the juices in the meat.
  7. Place the porchetta on a cutting board, slice and serve. You can spoon the pan drippings onto the porchetta slices for extra moisture and flavor.

For the garlic bread: 

1 loaf of french bread (not baguette), about 1-1 1/2 feet

4 tablespoon of softened unsalted butter

1/2 teaspoon salt

4 cloves of garlic, minced.

  1. Slice the bread horizontally along the length. Place both halves cut side up on a foil lined baking sheet.
  2. Add salt and minced garlic to softened butter and mix until well combined. Spread evenly on the bread.
  3. Set oven to “broil” and place the bread on the upper-middle rack of the oven for 3-4 minutes. The bread burns easily so keep a constant eye on it.
  4. Remove from oven, slice up and serve.

Honestly though, just put as much garlic and salt as you want in some unsalted butter, spread over some bread, toast, and BAM you get garlic bread. No recipe needed.

Enjoy!  

S & A

Red Bean Pastry

dscn3130

These little bites have a flaky, buttery shell and a soft, sweet center filled with red bean. They only require a few simple ingredients are are perfect for potlucks or parties.

dscn3055-2

Mix together butter, cream cheese, flour, and a touch of salt and you get something that resembles a pie crust or tart shell. Flaky, crumbly and delicious.

foursquare

When I made these in elementary school, I used to mash together the butter, cream cheese and flour with just my fingers and end up with globs of dough stuck all over my hands. They were such a pain to clean. Now, I use a food processor and gloves to make the dough. Using a food processor to cut together the flour and cold butter prevents the butter from melting due to the heat from your hands. Keeping the butter cold will lead to a flakier pastry.

When a dough ball forms, stop kneading. It’s not bread dough. Stop it.

dscn3088

Let the dough chill in the refrigerator for 30 minutes.

Divide into 30 equal portions. If the pastries are the same sizes, they will bake more evenly.

dscn3098-2

Flatten each disk with your palm and fingers. Make sure that the edges of the disk are thinner than the center so when we go to pinch it close, you don’t end up with too much dough at the seal.

dscn3103 strip

Line them up on a parchment lined baking sheet and coat with egg wash.

strip-2

Bake at 375 degrees Fahrenheit, middle rack for 25 minutes until golden brown.

dscn3120

Let them cool for a few minutes before eating. Don’t be like me and be impatient and burn myself.

dscn3122

dscn3127-2

Red Bean Pastries

Prep Time:  1 hr 40 min | Baking Time: 25 min | Makes 30

Ingredients:

4 oz. unsalted, cold butter

2 cups all purpose flour

8 oz. cream cheese

1/4 teaspoon salt

1/2 canned sweetened red bean. I used Shirakiku Ogura Sweetened Red Bean purchased at my local Asian supermarket.

1 egg yolk

1 teaspoon milk or heavy cream.

Directions

  1. Blend flour, cold butter, and salt in food processor until they resemble a coarse meal. Transfer the mixture into a bowl and add the cream cheese in chunks. Use a silicone spatula, then your hands (gloves recommended) to mix in the cream cheese until well incorporated and a smooth dough forms. The bowl should look clean. Do not over-knead the dough.
  2. Cover the bowl with cling film and chill in refrigerator for 30 minutes.
  3.  Preheat oven to 375 Fahrenheit and line two baking sheets with parchment paper. Open the canned red bean. In a small dish, whisk together the egg yolk and cream/milk to make an egg wash. Set aside.
  4. After 30 minutes, remove dough from refrigerator. Split the dough in half. Roll each half into a rod and cut 15 equal pieces from each rod. As if by magic, you now have 30 equal pieces.
  5. Flatten each piece into a disk. Press down on the edges more to make them thinner than the center. Use a spoon or butter knife to deposit 1/2 – 1 teaspoon of sweetened red bean onto the center of the disk. Pinch close the opening. I start by bringing the top and bottom of the dough over the red bean and pinching shut at the center point, then I bring in the left and right “flaps” to the center and pinch shut. With the remaining corners, I pinch, pull and smooth until the seams disappear. Be careful not to tear the dough.
  6. Place pastries seam-side down on a parchment lined baking sheet. Leave about 2 inches between each pastry. With a pastry brush (alternatively, use a piece of paper towel pinched between chopsticks), brush egg wash on each pastry.
  7. Bake at 375 degrees Fahrenheit, middle rack for 25 minutes until golden brown. Let cool slightly before serving.

Enjoy!

 S